Building within an Ecosystem

This will be a bit of an unusual one. I want to share a vernacular (and ongoing) story of building rehype-jsoncanvas. I've never built something like this before, and a loose record of the process feels justified.
If I got the plugin working for nextjS, it'll render below this text!
STATUS: Published on NPM and working (as seen above). It mostly works, but there's a bunch of edge cases I need to capture.
The idea
I mentioned two weeks ago that I was working on a small open source project to address a need I have with my obsidian.md to NextJS blog pipeline, and this was around my use of obsidian canvas. I love it, but there aren't clear ways of getting it to work.
After fiddling around with my markdown rendering tool (see below), I had figured out how to render out different treatments for things like images, and the same approach could apply to the canvas element. Surely salvation was close at hand. I just needed to figure out how this whole rehype/remark thing.
 <ReactMarkdown
	className={markdownStyles["markdown"]}
	rehypePlugins={[rehypeRaw]}
	remarkPlugins={[remarkGfm]}
	components={{
	  img: (props) => {
	  // This is where the idea came from
		if (props.src?.includes(".canvas")) {
		  return (
			<p className="p-3 bg-gray-100">
			  NOTE! Unsupported Json-canvas element.
			</p>
		  );
		  // return (<Canvas content={props.src as CanvasContent} />)
		}

		return typeof props.src === "string" ? (
		  <Link href={props.src} target="_blank">
			<Image
			  src={props.src}
			  alt={props.alt ? props.alt : ""}
			  width="500"
			  height="300"
			/>
		  </Link>
		) : (
		  ""
		);
	  },
	}}>
	{content}
</ReactMarkdown>
A tiny bit of research
Most of the markdown tools I've seen revolve around two things called Remark and Rehype. Previously, I've pumped my markdown files into these libraries while leveraging plugins from their ecosystem, but hadn't investigated too deeply.
Remark and Rehype are two parts of the UnifiedJS ecosystem, which is essentially a toolkit for manipulating different modes of content. They allow you to break a block of text data down into its individual components, and perform operations on those individual components. These bits get represented as syntax trees, and the unifiedJS ecosystem consists of tons of different tools to parse, filter, transform, traverse, and otherwise manipulate those trees and their nodes.
This was not apparent to me when I got started, so when I dove into the existing plugin ecosystem to look at code examples, I got pretty confused pretty quickly. This process of reading prior work is critical, because it roughs out the silhouette of your own work.
One example I looked at early on was rehype-inline-svg, which give me some inspiration on what kind of libraries I might want to use to get a tool like this going. Ultimately, I used it and a few other references (listed in the readme) to approach making the plugin.
Project Scaffolding
Since my goal with this project was to create a maintainable, opensource NPM package that folk could easily import into their package via import rehypeJsonCanvas from "rehype-jsoncanvas", I needed to approach this kind of project in a different way than my norm. Unfortunately I had no idea what I was doing, and really, I still don't. I know more now having made the effort, but this post is as much a cry for help as it is a how-to.
First, I wanted to make an example project that would let me develop in a project context while building something generalized. This proved to be both a great and terrible idea, which we'll see in the "wrong tools" section.
First, I landed on a tool called Yalc which lets to make a local NPM-like store. I could pretend that my project was already an NPM package and import it as needed, and make the project look like it was importing the npm module. This let me create a really quick demo react app which I called a "shim" that imported the project as you would in the real world, and render the markdown using the unified toolkit.
// this is an example string of remark and rehype plugins
// within which jsonCanvas would exist.
async function renderMarkdown(markdown) {
  const md = await unified()
	.use(parser)
	.use(mdast2hast)
	.use(remarkGfm)
	.use(remarkRehype)
	.use(rehypeJsonCanvas)
	.use(compiler, production)
	.process(markdown);

  return md;
}
This ended up working well, though you might notice this in the package.json scripts: "devpub": "yalc push --scripts --update --replace"
This seems to be the workaround for using yalc as a "live development" tool, i.e. not live but quick manual push with a full build process as an npm package. If you have any suggestions on how to improve this, PLEASE let me know.
For the plugin itself: I loosely knew the bounds of what I wanted to do, but didn't really understand the means. If you were to stumble back through my commit history for this project, you would see the project scaffolding change perhaps three times before I landed on a tool called microbundle.
This occurred because I was exploring the rehype-graphviz repo, and just found their approach quite readable and well considered. Interestingly, they didn't use microbundle themselves, but the collection of tools eventually led me to this microbundle template which became the current foundation of the project.
The reality is, I don't understand everything happening under the hood with this template, and am using it as an opportunity to learn as I go. The big things I'm hoping to take away from it are around testing with Vite, using github actions for dependencies and deploy(hat tip to my buddy Myles Borins here) via renovate and lefthook, and general build hygiene via biome. Again, trying to figure out the ecosystem.
The Plugin
Most everything up until now has just been setting up the project so that I could actually do work. I saw that initial bit of code on my blog as the proof of concept (even though no canvas was rendered), but it introduced the way I saw the process unfolding.
For the majority of the plugin code, I worked in stages to get incremental bits clearly working.
First was the decision to work with a REHYPE plugin instead of a Remark one, even though my primary use case was markdown.
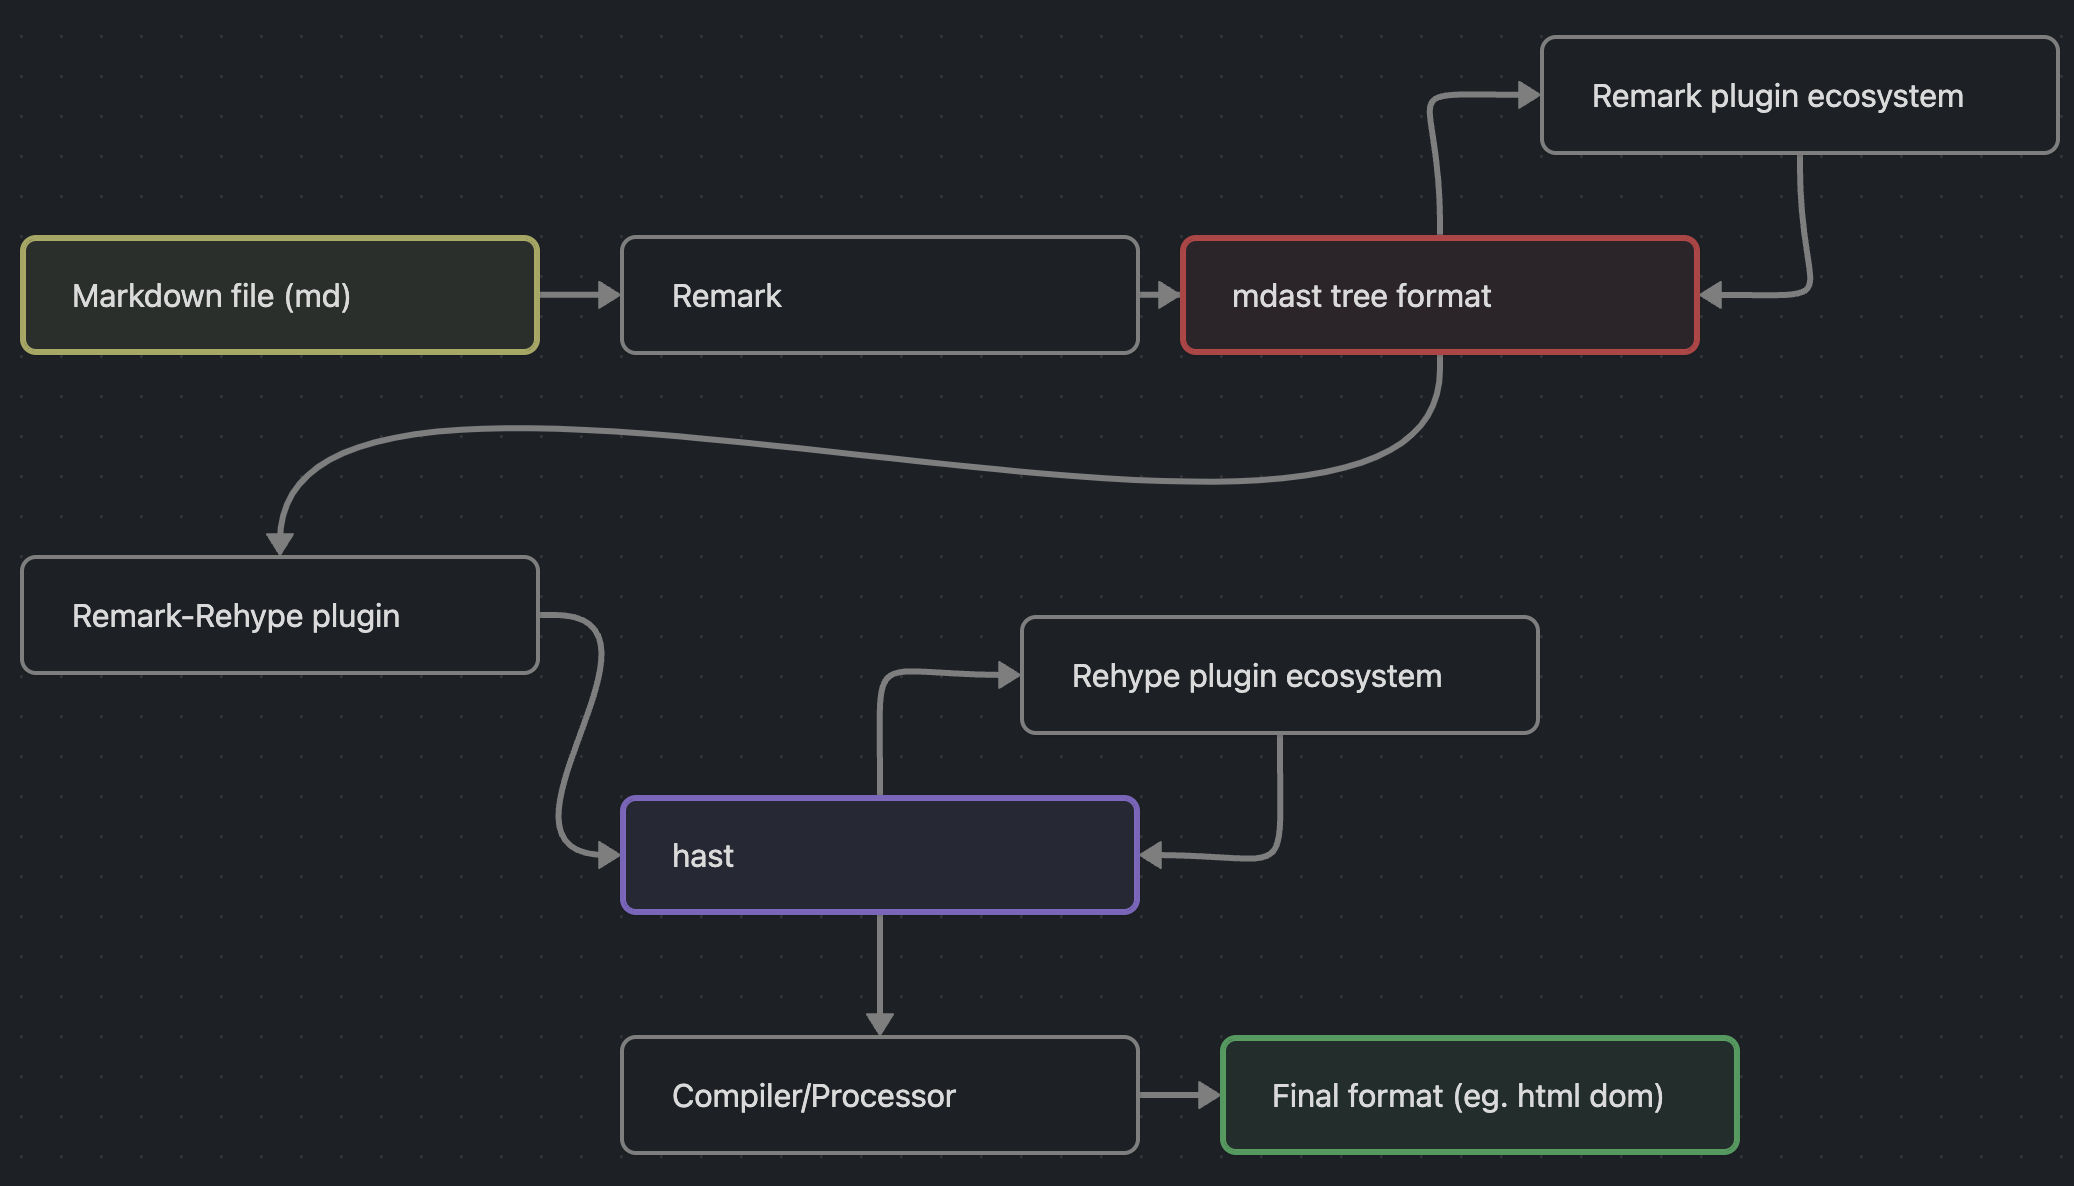
IRehype is used for transforming html, REMARK is used for transforming markdown. Both tools work by taking the constituant bits of content and breaking them down into a HAST (Hypertext Abstract Syntax Tree) for Rehype and an MDast for Markdown. So working within this ecosystem comes down to working with this HAST structure, and chaining different plugins to figuring out where in the rendered HTML you want your transformation to run.
Here's a helpful json-canvas to explain it (I'll replace it with a live one when it's ready)
 With that in mind, I divided the work into two sections: the plugin part to figure out WHERE to put the canvas and handle that log, and then the jsoncanvas part to figure out WHAT gets slotted into that section.
This ended up working well, since I was able to use the plugin part to render dummy data and understand the unifiedJS ecosystem first, before diving into working on the jsoncanvas rendering side of things.
Once I'd wrapped my head around the Unifiedjs way of doing things, the plugin part clicked quite quickly. Obsidian generates the canvases as separate .canvas files which are embedded like images  or embeds ![[example.canvas]]. The tool I use to publish Markdown to my blog converts these embeds into images, so for my purposes, the shortcut of referencing just the imgtag let me parse the unifiedjs tree easily. Then I had to swap out the image tag with an appropriate HTMLcanvas, image, or svg element.
Unfortunately, this is where things got a bit unhinged.
Picking the Wrong Tool
I ended up picking the wrong rendering tool for the purpose.
I wanted something that could be used both client side (your browser does the rendering, say on a react app) and server side (my server does the rendering, like on a nextjs or gatsby static site).
Because of this, I had an idea to use the HTML Canvas API, which is responsible for many of the interactive graphics you'll see in browsers today. From charts to animations to 3D, its a fantastic toolkit and well supported. It's browser only though, so I went with node-canvas, a tool that replicates most of the html canvas API so it can be used both in browser and server-side. Its well documented, mature, and I've used it before. Plus, I trust the Automattic team who supports it.
Two issues came up though: First, I wasted a ton of time trying to figure out the issue of embedding. Json-canvas allows you to embed media files and markdown into your canvas, and in obsidian, it looks .
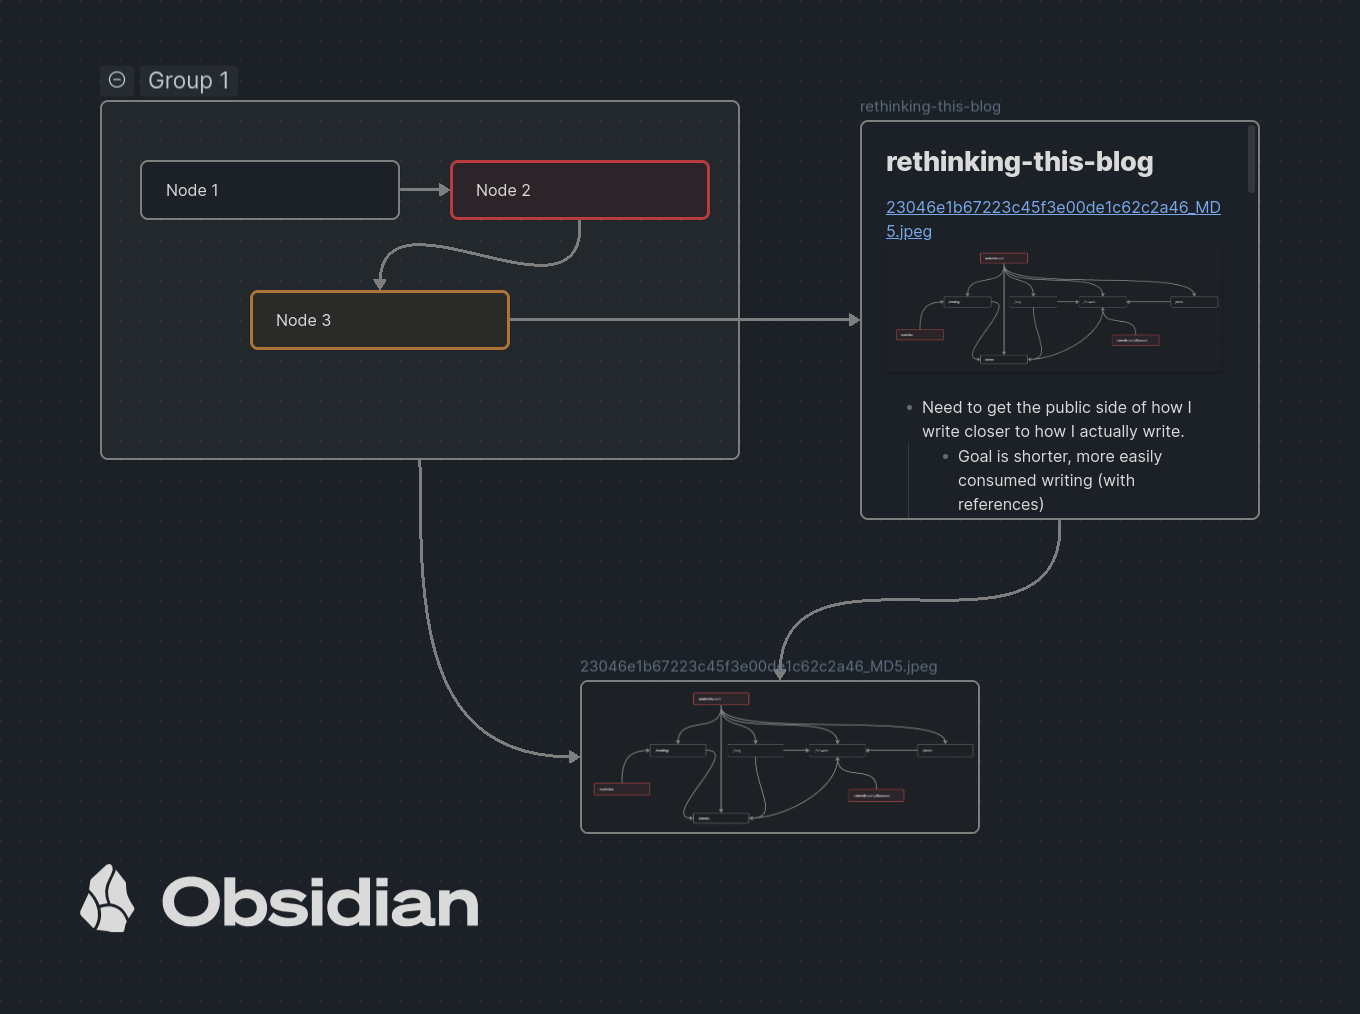
Take the markdown embed, which shows "rethinking-this-blog" as an embed. In the canvas, it appears as this object:
    {
      "id": "bc2ba4067167b9a9",
      "type": "file",
      "file": "example.md",
      "x": 300,
      "y": -260,
      "width": 400,
      "height": 400
    },
So you don't have any data, just a relative link to the filetype and some data that you can parse to render it in the right way. No problem, one would think.
I ended up wasting a fair bit of time trying to get those two objects (image and markdown) to render respectively, including this utterly psychotic recursive functions written in the hope that maybe I just wasn't letting the images load.
export function checkImagesLoaded(callback: Function) {
	let allLoaded = imagesLoaded.every((el) => el.complete);
	if (imagesLoaded.length < 1) return callback();

	if (allLoaded) callback();
	else checkImagesLoaded(callback);
}
Thankfully, I was saved from this by my second mistake.
Mistake Number 2. I misinterpreted some of the node-canvas documentation, which made me think that it would work in next. This wasn't the case, as I discovered pretty quickly when I spun up a NextJS application to test the seemingly working plugin (with the below rendering in the react app)
Yep, not next friendly. Which I could have figured out had I only searched for the specific framework. Goddamnit.
Anyway, the lesson here isn't that node-canvas is bad, but rather that I prematurely dove into implementing the rendering functions with a tool that I hadn't tested for the use case. To be honest, I've not needed to use shims like this before. I usually have the application itself and then build things around the main application. For me, the focus is on building something I can get in front of a person as quickly as possible.
But here, my user is a developer (or developer adjacent) who needs to slot this into their application and get on with their life. The point of this tool is to serve a function and disappear. And to do that, my process needs to be one of investigating the environments this will disappear into. This is what tests do, and its also what building testing jigs can facilitate.
Next steps
So, as of writing this on Tuesday before it goes out on the newsletter (and I'll be updating as I go and going forward), my rendering context doesn't work. I need to rip that out and redo it. The nice bit is that a LOT of the logic will translate over to whatever I decide on, and that was the majority of the thinking. All the data parsing, placement, sizing, looping, etc. works well, and I think I have a decent division of functions for now (I'll refactor after I get the core list done).
So far I've been able to replace most of the core rendering context with SVG using hastscript directly, so getting the proof of concept up to test across the two react and next ssr shims shouldn't take long.
Once that is in place, the next big hurdle will be reducing its package size, writing tests, and deploying it to NPM for others to use.
When it's up, I'm hoping some of my friends who are Obsidian users (I'm looking at Justin and Andrew here) will be able to give it a test with their own projects, and I'll be sending a request for feedback from the Obsidian community. I'll also be opening it up to PRs and issues.
As I mentioned, this is a first for me in building a real open source project, and so I'm expecting a big learning curve. But I believe the usage base for this is sufficient to warrant the effort, and I know I'll get some good use out of it for my writing as well.
If you have any advice for me from reading this, please send me a note, submit a PR, or otherwise send up signals. I'm eager to learn.
Main Personal Takeaway
The big thing I've glimpsed with this project is how interconnected even a solitary project like this might be. When you're building an application, you're thinking about its dependencies more from a risk and effort perspective vs. as someone seeking to reside within and be apart. But building something that consciously contributes to an existing ecosystem forces you to re-frame that thinking.
Two quotes come to mind:
“The earth I tread on is not a dead inert mass. It is a body— has a spirit— is organic— and fluid to the influence of its spirit— and to whatever particle of the spirit is in me” - Thoreau
“The world is a complex, interconnected, finite, ecological-social-psychological-economic system. We treat it as if it were not, as if it were divisible, separable, simple, and infinite. Our persistent, intractable global problems arise directly from this mismatch.” - Donella Meadows
I find the modern internet a bit sad and alienating. But building something on the internet that requires you to cut into the drywall, open up the utility closet, and short a few breakers. Well, I suddenly found myself a bit more at ease.